How to Clean Your Shaving Brush: A Complete Care Guide

Post Disclaimer
*We may earn a commission for purchases made using our links. Please see our disclosure to learn more.
As someone who’s been wet shaving for over a decade, I can tell you that a well-maintained shaving brush is essential for the perfect shave. Your brush is more than just a tool; it’s an investment in your grooming routine. Whether you’re using a luxurious badger hair brush or a modern synthetic one, proper care and cleaning are crucial for maintaining its performance and longevity.
So, how to clean a shaving brush? Today, I’ll share my expertise on the best methods to properly clean and care for your shaving brush, ensuring it continues to serve you well for years to come.
Key Takeaways
- Clean your shaving brush thoroughly after each use to prevent soap buildup and bacteria growth
- Deep clean your brush monthly using gentle cleaning solutions
- Proper drying and storage are crucial for maintaining brush shape and preventing mold
- Quality brush cleaners and stands can significantly extend your brush’s lifespan
- Different brush materials (badger, boar, synthetic) require slightly different care approaches
Understanding Your Shaving Brush
Before diving into the methods of how to clean a shaving brush, it’s important to understand what makes up your shaving brush. The brush consists of several key components:
The Handle
Usually made from wood, plastic, or metal, the handle provides grip and balance. Different materials require different care approaches, wooden handles, for instance, need protection from excessive moisture.
The Knot
This is where the bristles are gathered and secured to the handle. The knot size affects how much water and lather the brush can hold. A well-maintained knot ensures your brush stays intact and performs optimally.
The Bristles
Whether natural (badger, boar, horse) or synthetic, bristles are the workhorses of your brush. Each material has unique characteristics:
- Badger hair: Soft, water-retentive, and requires gentle care
- Boar bristles: Stiffer, more durable, but need proper breaking in
- Synthetic: Easy to maintain, quick-drying, and very durable
Recommended Cleaning Products
After years of testing various products, here are my top recommendations available:
General Pencil Company The Masters Brush Cleaner & Preserver


Give your brushes the care they deserve with The Masters Brush Cleaner & Preserver by General’s. This highly effective, best-selling cleaner removes even dried-on paint, including acrylics and watercolors, while conditioning the bristles to maintain their shape and softness. Its unscented, non-toxic formula is gentle yet powerful, helping to extend the lifespan of your brushes. Whether you're an artist, hobbyist, or professional, this brush cleaner ensures your tools stay in top condition for consistent, high-quality results.
- Deep Cleaning Power: Effectively removes paint, including dried acrylics and watercolors.
- Brush Preservation: Conditions and restores bristles, keeping them soft and in shape.
- Versatile Use: Works on a variety of brush types and paint mediums.
- Multiple Applications Needed: May require repeated cleaning for heavily stained brushes.
- Small Container Size: Can run out quickly with frequent use.
- Limited for Oil Paints: Less effective on oil-based paints compared to other solvents.
Why I Love It: The Masters Brush Cleaner & Preserver isn’t just for art brushes, it’s a game-changer for shaving brushes too. Its deep-cleaning formula removes built-up shaving soap, creams, and natural oils that can clog bristles over time. Unlike harsh detergents, it conditions the bristles, keeping them soft, flexible, and in top shape. Plus, since it works on delicate natural hair and synthetic fibers, it helps extend the life of your brush without causing damage.
Best for: Anyone who wants to keep their shaving brush clean, soft, and long-lasting. Ideal for both natural and synthetic bristles, it’s perfect for wet shavers who want a thorough but gentle cleaning solution.
Price Point: Around $11.99 for a 2.5 oz container, offering excellent value for a long-lasting brush cleaner and preserver.
U.S. Art Supply Brush Cleaner and Restorer

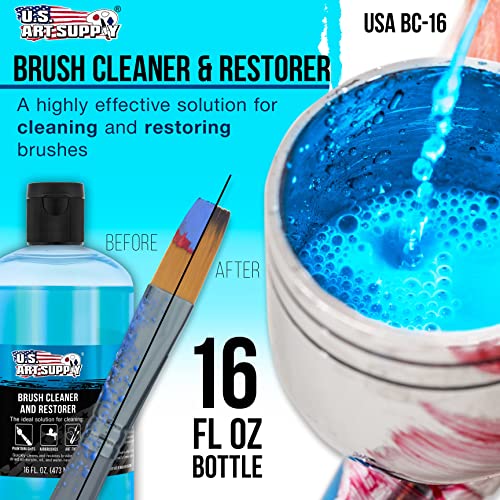

The U.S. Art Supply Brush Cleaner and Restorer is a powerful cleaning solution designed to remove dried-on acrylic, oil, gouache, inks, and water-based paints from brushes, airbrushes, and other art tools. Its high-performance formula restores old, stiff brushes, extending their lifespan and keeping them in top shape. Easy to use, it quickly breaks down paint residue, allowing for deep cleaning without damaging delicate bristles. Whether you're an artist or a wet shaver, this cleaner is a reliable solution for maintaining your brushes.
- Deep Cleaning Power: Effectively removes dried-on paint, soap, and product buildup.
- Versatile Use: Works on brushes, airbrushes, and various art tools.
- Restores and Conditions: Helps bring old brushes back to life, extending their lifespan.
- Strong Formula: May require ventilation due to its potent cleaning power.
- Longer Soaking Time: Stubborn residue may need hours of soaking.
- Not Ideal for Delicate Bristles: Prolonged exposure may weaken very fine brush hairs.
Why I Love It: The U.S. Art Supply Brush Cleaner and Restorer is a powerhouse when it comes to removing stubborn buildup, not just for paintbrushes but also for shaving brushes. Its liquid formula easily breaks down dried soap, cream, and natural oil residue, ensuring deep cleaning without damaging the bristles. Unlike harsher solvents, it works gently to restore softness and flexibility, keeping your shaving brush in peak condition for longer.
Best for: Anyone looking for a deep-cleaning solution for their shaving brush. Ideal for those who use thick shaving creams or hard soaps that tend to build up over time. Works well for both synthetic and natural bristles.
Price Point: Around $15.99 for a 16 oz bottle, making it a cost-effective option for regular maintenance and brush restoration.
U.S. Art Supply Deluxe Brush Cleaner & Washer


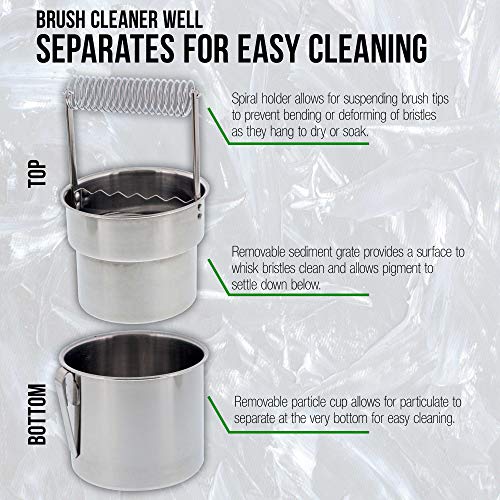
The US Art Supply Deluxe Brush Cleaner and Washer is a must-have tool for artists looking to maintain their brushes in top condition. Made of rust-proof stainless steel, it features a spiral holder that suspends the brush tips, preventing damage and deformation while drying or soaking. The removable sediment grate and particle cup allow pigment to settle below, ensuring effective cleaning without harming the bristles. Perfect for use with oil, acrylic, or watercolor paints, this brush washer makes cleanup fast, easy, and thorough.
- Durable Stainless Steel: Rust-proof and built for longevity.
- Brush Protection: Spiral holder suspends brushes, preventing bristle damage.
- Efficient Cleaning: Sediment grate and mesh screen help to thoroughly remove pigments.
- Large Size: May be too bulky for small workspaces.
- Compatibility: May not fit brushes with oversized handles.
- Manual Effort: Requires active participation to clean and set up the brush for soaking.
Why I Love It: The U.S. Art Supply Deluxe Brush Cleaner & Washer is a fantastic solution for both artists and wet shavers looking to preserve their brush investments. The stainless steel construction ensures rust resistance, while the spiral holder gently suspends the brush bristles, preventing any bending or loss of shape. With its removable particle cup and sediment grate, it traps paint residue and shaving soap buildup, making deep cleaning quick and effective. Whether you’re tackling stubborn paint or thick soap residue, this brush washer delivers a professional-quality clean with ease.
Best for: Artists, wet shavers, and anyone seeking a reliable tool to clean and maintain brushes. Perfect for those who want to extend the lifespan of their brushes by preventing buildup and bristle damage.
Price Point: Priced at $19.99, this durable stainless steel brush cleaner is a smart investment for anyone looking for efficient and long-lasting brush care.
Parker Safety Razor Adjust-O-Stand


The Parker Safety Razor Adjust-O-Stand is a must-have for wet shavers looking for a customizable and stylish way to store their shaving tools. Designed with patent-pending adjustable prongs, this stand fits virtually any shave brush handle width, providing a secure and personalized fit. The weighted chrome base ensures stability, preventing accidental tip-overs, while the bristles-down drying position extends the life of your brush by reducing moisture buildup. With a high-luster chrome finish and rubberized feet to protect your countertops, this stand seamlessly blends luxury with practicality.
- Adjustable Fit: Customizable prongs accommodate almost any shave brush size.
- Sturdy & Stable: Weighted base prevents tipping and keeps your tools secure.
- Sleek Design: High-luster chrome finish adds a stylish touch to your shaving setup.
- Higher Price Point: More expensive than standard fixed stands.
- Bulkier Base: May take up more space on smaller countertops.
- Adjustment Needed: Requires minor setup to fit different brush sizes.
Why I Love It: The Parker Safety Razor Adjust-O-Stand is a game-changer for wet shavers looking for a reliable and customizable storage solution. Unlike traditional stands, its patent-pending adjustable prongs accommodate virtually any shave brush size, ensuring a snug and secure fit. The weighted chrome base provides excellent stability, preventing accidental tip-overs, while the bristles-down drying position helps extend the lifespan of your shaving brush by preventing moisture buildup. With a sleek, high-luster chrome finish, this stand is both functional and stylish, making it a great addition to any shaving setup.
Best for: Wet shavers who want a versatile, durable, and elegant stand that can hold different brush sizes while keeping their grooming tools in top condition.
Price Point: Priced around $34.77, this high-quality stainless steel stand offers premium durability and a sleek aesthetic, making it a worthwhile investment for serious wet shavers.
Daily Cleaning Routine
The key to maintaining a healthy shaving brush lies in daily care. Here’s my detailed step-by-step process for how to clean a shaving brush after each use:
1. Initial Rinse
Start by thoroughly rinsing your brush under warm (not hot) water. I gently squeeze the bristles while rinsing to remove most of the lather. Continue until the water runs clear, which usually takes about 30-45 seconds. Pay special attention to the water temperature – it should be comfortably warm but never hot, as excessive heat can damage both natural and synthetic bristles.
2. Gentle Cleansing
Using your fingertips, carefully massage the bristles to work out any remaining soap. Pay special attention to the base of the bristles where soap can accumulate. I’ve found that making circular motions helps dislodge stubborn residue. Work from the base of the bristles toward the tips, similar to how you’d wash your own hair.
For natural hair brushes, be especially gentle during this process. These bristles are more delicate when wet and can break if handled roughly. For synthetic brushes, you can be a bit more vigorous, but still maintain a gentle touch to preserve the bristle arrangement.
3. Final Rinse
Give your brush a final rinse under cool water. This helps close the bristle fibers and removes any lingering soap. I always check the water running off the brush – it should be completely clear. The cool water also helps set the bristles in their proper shape and adds a bit of extra resilience to natural hair brushes.
4. Drying Process
This step is crucial for the longevity of your brush. First, gently squeeze out excess water (never wring or twist the bristles). Then, give your brush a few gentle shakes to remove more water. Finally, use a clean towel to carefully pat the bristles dry. I like to shape the bristles during this step, gently molding them into their proper form.
Monthly Deep Cleaning
Even with diligent daily care, your brush needs a thorough cleaning every month. Here’s my comprehensive deep-cleaning method:
1. Prepare the Cleaning Solution
Mix a small amount of brush cleaner (or mild shampoo) with warm water in a clean container. If using Masters Brush Cleaner, create a light lather with the soap cake. The solution should be warm enough to clean effectively but not so hot that it damages the bristles or handle.
2. Soak and Clean
Immerse your brush in the solution and gently work it through the bristles for 2-3 minutes. This helps break down accumulated soap scum and skin oils. For natural bristle brushes, this step is particularly important as they tend to trap more debris due to their scaly structure.
During the soaking process, gently squeeze and release the bristles to ensure the cleaning solution penetrates deep into the knot. You might notice the water becoming slightly discolored – this is normal and shows that the cleaning is effective.
3. Thorough Rinse
Rinse the brush thoroughly under running water until all cleaning solution is removed. This might take several minutes – patience is key. Keep rinsing until the water runs completely clear and you can’t detect any soap smell.
4. Disinfecting (Optional)
For extra hygiene, you can create a solution of one part white vinegar to four parts water. Soak the brush for 5 minutes, then rinse thoroughly. This step is particularly useful if you’ve noticed any odd odors or if you’ve been storing your brush in a humid environment.
Proper Storage Techniques
How you store your brush between uses significantly impacts its longevity. Here’s what I’ve learned over the years:
1. Use a Brush Stand
Always store your brush upside down on a stand. This allows water to drain away from the handle and prevents water from settling in the knot (where the bristles meet the handle). A good stand will also help maintain the brush’s shape and prevent any flat spots from developing.
2. Ventilation
Keep your brush in a well-ventilated area. Avoid storing it in closed cabinets where moisture can lead to mildew growth. Good air circulation is essential for proper drying and preventing bacterial growth. I prefer keeping my brush on an open counter or shelf where air can freely circulate around it.
3. Travel Considerations
When traveling, use a ventilated brush tube or case. Never store a damp brush in an airtight container. If you must pack your brush while it’s still slightly damp, make sure to take it out and let it air dry as soon as possible at your destination.
Advanced Brush Maintenance Tips
Beyond basic cleaning and storage, here are some advanced tips I’ve gathered over the years:
- Replace your brush if you notice significant bristle loss or an unpleasant odor that persists after cleaning
- Rotate your brush periodically if you’re storing it on a stand to prevent the bristles from developing a permanent lean
- Consider using distilled water for cleaning if you have hard water, which can leave mineral deposits in the bristles
- Never use hot water, as it can damage both natural and synthetic bristles
- Avoid harsh cleaning agents like bleach or strong detergents
- Pay attention to the handle material – wooden handles may need occasional oiling
- Consider using a brush restorer product every few months to maintain bristle quality
- Watch for signs of knot loosening and address any issues promptly
Conclusion
A quality shaving brush is an investment that can greatly enhance your grooming routine, and proper cleaning and maintenance are essential for preserving its performance and longevity. How to clean a shaving brush regularly removes soap, cream, and buildup, helping to maintain soft bristles and prevent damage. The key to maintaining a healthy shaving brush lies in daily care. Regularly cleaning your brush ensures it remains effective for years. Spending just a few minutes caring for your brush after each use results in smoother shaves, improved lathering, and a tool that stays in excellent condition over time.
Frequently Asked Questions
Q: How often should I replace my shaving brush?
A: With proper care, a quality brush can last 5-10 years or more. However, if you notice significant bristle loss, persistent odors, or deterioration in performance, it’s time for a replacement. Natural hair brushes typically have a longer lifespan than synthetic ones when properly maintained.
Q: Can I use regular soap to clean my brush?
A: While mild soap can work for daily cleaning, I recommend using dedicated brush cleaners for monthly deep cleaning. They’re specifically formulated to preserve the bristles and remove buildup without causing damage. Regular soaps might leave residues that can affect lather quality and brush performance.
Q: Why does my brush smell musty?
A: A musty smell typically indicates that your brush isn’t drying properly between uses. Make sure you’re storing it in a well-ventilated area and consider using a brush stand to promote better drying. If the smell persists after deep cleaning, it might indicate mold growth, which could require brush replacement.
Q: Is it normal for my new brush to shed?
A: Some initial shedding is normal during the first few uses of a new brush, particularly with natural bristles. However, excessive or continuous shedding might indicate a quality issue. Most quality brushes should stabilize after 5-10 uses.
Q: Can I use a hair dryer to dry my brush?
A: I don’t recommend using a hair dryer, as the heat can damage the bristles and potentially loosen the glue holding them in place. Air drying is the safest method. If you’re in a hurry, you can gently press the brush between clean towels, but avoid applying heat or excessive pressure.